Physical Face Following with OpenCV on Android
October 13, 2012 24 Comments
Here I am again, less than 2 days after my latest post… this must be the shortest delay ever between 2 consecutive posts.
First of all I hope you guys will approve of my choice of face to follow ! 🙂 The English title is “All about my mother” by Almodóvar, which I’ve never actually seen, but my wife tells me it’s a really good movie… !
This project is not doing a huge lot, but I’m still posting it here, mainly as a reference for myself in case I’ll want to take it further one day. Besides, there are plenty of nice pictures and 2 videos ! 🙂
I’ve been wanting to learn and do something “cool” with OpenCV for a while now, and when a few months ago I learnt that there was even an Android version, I got really excited !
Finally, the simplest thing I could think of was to have a phone use its camera to follow you !
Print the custom mount
This project was the perfect occasion to use my new (probably not any more actually, but certainly underused ) Ultimaker 3D Printer.
As with most hobbyist endeavours this was more complicated than it sounds… I hadn’t used my printer for a couple of months and had several issues, of which most important were:
- loose belts due to motor screws loosening – fixed by re-tightening the screws and adding some Lego pieces to the belts (known issue with Ultimakers, you can find more details on their forums)
- stuck filament which made it miss several layers in the middle of the print – attempted fix with a new feeder printer from Thingiverse (again known issue with these printers you can find more details on their forums)
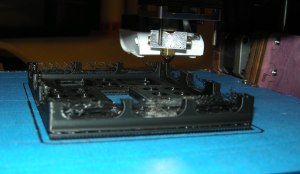
Filament got stuck and hence a couple of layers are missing, until I realised and manually unblocked the feeder…
All in all, I’m disappointed with my Ultimaker as for the price (one of the most expensive hobbyist 3D printers) it still requires a lot of finagling to print stuff… but again this is the only printer I’ve ever used so I don’t really know how “bad” are the others.
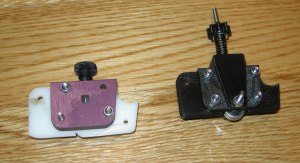
Here’s the new feeder mechanism, which is supposed to be better than the original one, as using a spring and hence keeping a constant pressure on the filament, regardless of small variations in its diameter… or so the theory goes, in my case the spring I think is too soft, as I had to tighten the nut completely, which negates the very purpose of the spring… 😉
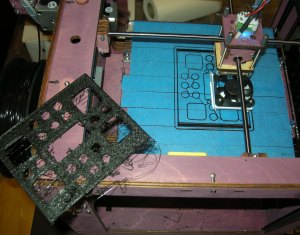
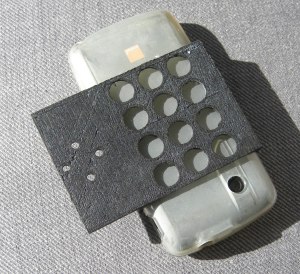
I had to re-start from the beginning the base, after having altered the design slightly, and replaced the big square holes, with smaller, round ones, to ensure the printer can cope with them. This is what they mean when they say that you have to keep in mind how something will be fabricated when designing an object…
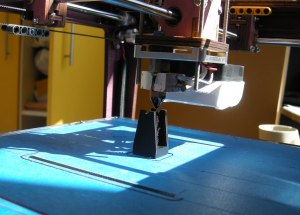
Finally, the support of the phone itself (that goes on top of the 2 servos) went much more smoothly, either thanks to the previous experience or simply because the piece was smaller… lesson number 2, print small pieces and screw them together is easier than big ones.
One of the reasons I paid so much for the Ultimaker is its very big printing volume… but now I realise this is often useless, as if the printing is unreliable you don’t want to print big things anyhow as the risk of having problems at the end and having to throw everything away is too big.
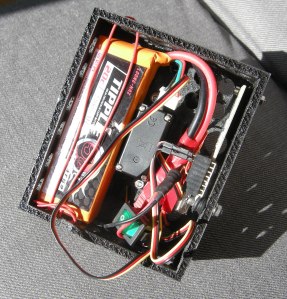
And finally here is the case with the electronics mounted inside. You can see the IOIO board, the base servo and the 3S Lipo battery that provides electricity for both the phone (which has a dead battery) and the servos.
Program the Android phone
This is not overly complex, it’s all about wiring together the OpenCV library using its face recognition functions with the IOIO library that gives access to the physical world.
Throw in there a PID controller for ensuring the accuracy of the following and you’re done.
The jittering that you see in the video comes from the low FPS that can be obtains with the relatively low computation power of the phone (low for computer vision that is, as this is more than enough for plenty of other tasks !).
Here are the Java files. There are also some C++ ones if you want to use the native classifier in OpenCV, but I found that the Java one performs as well / fast.
DetectionBasedTracker.java
-------------------------------------------------------
package trandi.facefollowing;

import org.opencv.core.Mat;
import org.opencv.core.MatOfRect;

public class DetectionBasedTracker {
 static {
 System.loadLibrary("detection_based_tracker");
 }

 private long mNativeObj = 0;

private static native long nativeCreateObject(String cascadeName, int minFaceSize);
 private static native void nativeDestroyObject(long thiz);
 private static native void nativeStart(long thiz);
 private static native void nativeStop(long thiz);
 private static native void nativeSetFaceSize(long thiz, int size);
 private static native void nativeDetect(long thiz, long inputImage, long faces);

public DetectionBasedTracker(String cascadeName, int minFaceSize) {
 mNativeObj = nativeCreateObject(cascadeName, minFaceSize);
 }

public void start() {
 nativeStart(mNativeObj);
 }

public void stop() {
 nativeStop(mNativeObj);
 }

public void setMinFaceSize(int size) {
 nativeSetFaceSize(mNativeObj, size);
 }

public void detect(Mat imageGray, MatOfRect faces) {
 nativeDetect(mNativeObj, imageGray.getNativeObjAddr(),
 faces.getNativeObjAddr());
 }

public void release() {
 nativeDestroyObject(mNativeObj);
 mNativeObj = 0;
 }
}

FaceDetectionView.java
-------------------------------------------------------
package trandi.facefollowing;

import java.io.File;
import java.io.FileOutputStream;
import java.io.IOException;
import java.io.InputStream;
import java.io.OutputStream;

import org.opencv.android.Utils;
import org.opencv.core.Core;
import org.opencv.core.Mat;
import org.opencv.core.MatOfRect;
import org.opencv.core.Point;
import org.opencv.core.Rect;
import org.opencv.core.Scalar;
import org.opencv.core.Size;
import org.opencv.highgui.Highgui;
import org.opencv.highgui.VideoCapture;
import org.opencv.objdetect.CascadeClassifier;

import android.content.Context;
import android.graphics.Bitmap;
import android.util.Log;
import android.view.SurfaceHolder;

class FaceDetectionView extends OpenCvViewBase {
 private static final String TAG = FaceDetectionView.class.getSimpleName();

 private static final int CONFIDENCE_COUNT = 3; // how many times to see the face appear/dissapear before it's trusted

 private Mat _rgbaMat;
 private Mat _grayMat;
 private CascadeClassifier _javaDetector;
 private DetectionBasedTracker _nativeDetector;

 private Point _filteredCentre;
 private int _appearCount = 0;
 private int _disappearCount = 0;

public FaceDetectionView(Context context) {
 super(context);

try {
 // copy the resource into an XML file so that we can create the classifier
 final File cascadeFile = getCascade(R.raw.lbpcascade_frontalface);

_javaDetector = new CascadeClassifier(cascadeFile.getAbsolutePath());
 if (_javaDetector.empty()) {
 Log.e(TAG, "Failed to load cascade classifier");
 _javaDetector = null;
 } else{
 Log.i(TAG, "Loaded cascade classifier from " + cascadeFile.getAbsolutePath());
 }

 //_nativeDetector = new DetectionBasedTracker(cascadeFile.getAbsolutePath(), 0);

cascadeFile.getParentFile().delete();
 cascadeFile.delete();

} catch (IOException e) {
 e.printStackTrace();
 Log.e(TAG, "Failed to load cascade. Exception thrown: " + e);
 }
 }

private File getCascade(final int cascadeRessourceId) throws IOException{
 InputStream is = null;
 OutputStream os = null;

 try{
 is = getContext().getResources().openRawResource(cascadeRessourceId);
 File cascadeDir = getContext().getDir("cascade", Context.MODE_PRIVATE);
 File cascadeFile = new File(cascadeDir, "cascade.xml");
 os = new FileOutputStream(cascadeFile);

 byte[] buffer = new byte[4096];
 int bytesRead;
 while ((bytesRead = is.read(buffer)) != -1) {
 os.write(buffer, 0, bytesRead);
 }

 return cascadeFile;
 }finally{
 is.close();
 os.close();
 }
 }

 @Override
 protected Bitmap processFrame(VideoCapture capture) {
 capture.retrieve(_rgbaMat, Highgui.CV_CAP_ANDROID_COLOR_FRAME_RGBA);
 capture.retrieve(_grayMat, Highgui.CV_CAP_ANDROID_GREY_FRAME);

final int height = _grayMat.rows();
 final int faceSize = Math.round(height * ((MainActivity)getContext()).getMinFaceSize());
 final MatOfRect faces = new MatOfRect();

 if (_javaDetector != null){
 // TODO: objdetect.CV_HAAR_SCALE_IMAGE
 _javaDetector.detectMultiScale(_grayMat, faces, 1.1, 2, 2, new Size(faceSize, faceSize), new Size());
 }else if(_nativeDetector != null){
 _nativeDetector.setMinFaceSize(faceSize);
 _nativeDetector.detect(_grayMat, faces);
 }

if(faces.empty()){
 _disappearCount ++;
 if(_disappearCount > CONFIDENCE_COUNT) {
 _filteredCentre = null;
 _appearCount = 0;
 }
 }else{
 _appearCount ++;
 if(_appearCount > CONFIDENCE_COUNT){
 _disappearCount = 0;
 for (Rect r : faces.toArray()){
 final Point centre = new Point(r.x + r.width/2, r.y + r.height/2);
 _filteredCentre = filterPoint(_filteredCentre, centre);

 // draw the face
 Core.circle(_rgbaMat, centre, r.width/2, new Scalar(0, 255, 0), 3);
 }
 }
 }

 // draw the filtered centre
 if(_filteredCentre != null){
 Core.circle(_rgbaMat, _filteredCentre, 6, new Scalar(255, 0, 0), -1);
 }

Bitmap bmp = Bitmap.createBitmap(_rgbaMat.cols(), _rgbaMat.rows(), Bitmap.Config.RGB_565);

try {
 Utils.matToBitmap(_rgbaMat, bmp);
 return bmp;
 } catch(Exception e) {
 Log.e(TAG, "Utils.matToBitmap() throws an exception: " + e.getMessage());
 bmp.recycle();
 return null;
 }
 }


 private static Point filterPoint(Point oldPos, Point newPos){
 if(oldPos == null) return newPos;
 if(newPos == null) return oldPos;

 final double filteringCoef = 0.9;
 return new Point(weightedAvg(oldPos.x, newPos.x, filteringCoef), weightedAvg(oldPos.y, newPos.y, filteringCoef));
 }

 private static double weightedAvg(double x, double y, double relativeWeight){
 return x * (1 - relativeWeight) + y * relativeWeight;
 }


 @Override
 public void surfaceChanged(SurfaceHolder _holder, int format, int width, int height) {
 super.surfaceChanged(_holder, format, width, height);

synchronized (this) {
 // initialize Mats before usage
 _grayMat = new Mat();
 _rgbaMat = new Mat();
 }
 }

@Override
 public void run() {
 super.run();

synchronized (this) {
 // Explicitly deallocate Mats
 if (_rgbaMat != null)
 _rgbaMat.release();
 if (_grayMat != null)
 _grayMat.release();
 if (_nativeDetector != null)
 _nativeDetector.release();

_rgbaMat = null;
 _grayMat = null;
 _nativeDetector = null;
 }
 }


 public Point getFaceCentre(){
 return _filteredCentre;
 }
}

FpsMeter.java
-------------------------------------------------------
package trandi.facefollowing;

import java.text.DecimalFormat;

import org.opencv.core.Core;

import android.graphics.Canvas;
import android.graphics.Color;
import android.graphics.Paint;

public class FpsMeter {
 private final static int TEXT_SIZE = 40;

 final int step = 20;
 final double freq = Core.getTickFrequency();
 final DecimalFormat decimalFormat = new DecimalFormat("0.00");

 int framesCounter;
 long prevFrameTime;
 String strfps;
 Paint paint;

public void init() {
 framesCounter = 0;
 prevFrameTime = Core.getTickCount();
 strfps = "";

paint = new Paint();
 paint.setColor(Color.BLUE);
 paint.setTextSize(TEXT_SIZE);
 }

public void measure() {
 framesCounter++;
 if (framesCounter % step == 0) {
 final long time = Core.getTickCount();
 final double fps = step * freq / (time - prevFrameTime);
 prevFrameTime = time;
 strfps = decimalFormat.format(fps) + " FPS";
 }
 }

public String getFps(){
 return strfps;
 }

 public void draw(Canvas canvas, float offsetx, float offsety) {
 canvas.drawText(strfps, offsetx, TEXT_SIZE + offsety, paint);
 }

}

IOIOServo.java
-------------------------------------------------------
package trandi.facefollowing.ioio;

import ioio.lib.api.IOIO;
import ioio.lib.api.PwmOutput;
import ioio.lib.api.exception.ConnectionLostException;


public class IOIOServo {
 private final static float MIN_DUTY_CYCLE = 0.03f;
 private final static float MAX_DUTY_CYCLE = 0.12f;
 public final static float MIN_DEG = 0f;
 public final static float MAX_DEG = 180f;

// setPulseWidth(x); with x between 1000us and 2000us. BUT setPulseWidth does NOT work for some reason !!!!
// setDutyCycle(x) where x between 0.05 and 0.1 which corresponds to the same thing IF the frequency is 50Hz!
 private final PwmOutput _pwmOutput;
 private float _currentPosition;
 private final float _minPos;
 private final float _maxPos;

public IOIOServo(IOIO ioio, int pin) throws ConnectionLostException{
 this(ioio, pin, MIN_DEG, MAX_DEG);
 }

 public IOIOServo(IOIO ioio, int pin, float minDeg, float maxDeg) throws ConnectionLostException{
 // 50Hz is important as it corresponds to 20ms period, which is what the RC servo expects (actually the max)
 _pwmOutput = ioio.openPwmOutput(pin, 50);

 _minPos = Math.max(minDeg, MIN_DEG);
 _maxPos = Math.min(maxDeg, MAX_DEG);

 _currentPosition = (_maxPos - _minPos) / 2;
 }

 public void setPosition(float degrees) throws ConnectionLostException{
 _currentPosition = bounded(degrees);
 _pwmOutput.setDutyCycle(degreesToDutyCycle(_currentPosition));
 }

 public float getCurrPosition(){
 return _currentPosition;
 }

 private float bounded(float degrees){
 return Math.min(Math.max(_minPos, degrees), _maxPos);
 }

 private static float degreesToDutyCycle(float deg){
 return MIN_DUTY_CYCLE + (deg - MIN_DEG)/(MAX_DEG - MIN_DEG) * (MAX_DUTY_CYCLE - MIN_DUTY_CYCLE);
 }
}

MainActivity.java
-------------------------------------------------------
package trandi.facefollowing;

import java.text.DecimalFormat;
import java.text.NumberFormat;

import ioio.lib.api.PwmOutput;
import ioio.lib.api.exception.ConnectionLostException;
import ioio.lib.util.AbstractIOIOActivity;

import org.opencv.android.BaseLoaderCallback;
import org.opencv.android.LoaderCallbackInterface;
import org.opencv.android.OpenCVLoader;
import org.opencv.core.Point;

import trandi.facefollowing.ioio.IOIOServo;
import android.app.AlertDialog;
import android.content.DialogInterface;
import android.os.Bundle;
import android.util.Log;
import android.view.Menu;
import android.view.MenuItem;
import android.view.Window;
import android.widget.LinearLayout;
import android.widget.SeekBar;
import android.widget.SeekBar.OnSeekBarChangeListener;
import android.widget.TextView;

public class MainActivity extends AbstractIOIOActivity {
 private static final String TAG = MainActivity.class.getSimpleName();

 private volatile FaceDetectionView _faceDetectionView;

 private MenuItem _itemFace50;
 private MenuItem _itemFace20;
 private float _minFaceSize = 0.4f;

 private TextView _msg;
 private SeekBar _speedSeekBar;
 // has to be volatile as it's shared between the IOIO and GUI threads !
 private volatile int _seekBarProgress;
 private BaseLoaderCallback _openCVCallBack = new BaseLoaderCallback(this) {
 @Override
 public void onManagerConnected(int status) {
 switch (status) {
 case LoaderCallbackInterface.SUCCESS:
 {
 info("OpenCV loaded successfully", true);

 // Load native libs after OpenCV initialization
 // System.loadLibrary("detection_based_tracker");

// Create and set View (replace the bogus one created by the main.xml layout)
 _faceDetectionView = new FaceDetectionView(mAppContext);
 ((LinearLayout)findViewById(R.id.cameraFeedHolder)).addView(_faceDetectionView);

 // Check native OpenCV camera
 if( !_faceDetectionView.openCamera() ) {
 AlertDialog ad = new AlertDialog.Builder(mAppContext).create();
 ad.setCancelable(false); // This blocks the 'BACK' button
 ad.setMessage("Fatal error: can't open camera!");
 ad.setButton("OK", new DialogInterface.OnClickListener() {
 public void onClick(DialogInterface dialog, int which) {
 dialog.dismiss();
 finish();
 }
 });
 ad.show();
 }
 } break;
 default:
 {
 super.onManagerConnected(status);
 } break;
 }
 }
 };
 /** Called when the activity is first created. */
 @Override
 public void onCreate(Bundle savedInstanceState) {
 super.onCreate(savedInstanceState);
 requestWindowFeature(Window.FEATURE_NO_TITLE);

 setContentView(R.layout.main);

 _msg = (TextView) findViewById(R.id.textViewMsg);
 _speedSeekBar = (SeekBar) findViewById(R.id.seekBarSpeed);
 _speedSeekBar.setMax(150);
 _speedSeekBar.setOnSeekBarChangeListener(new OnSeekBarChangeListener(){
 @Override
 public void onProgressChanged(SeekBar seekBar, int progress, boolean fromUser) {
 _seekBarProgress = progress;
 }

@Override
 public void onStartTrackingTouch(SeekBar seekBar) {
 }

@Override
 public void onStopTrackingTouch(SeekBar seekBar) {
 }
 });

 info("Trying to load OpenCV library", true);
 if (!OpenCVLoader.initAsync(OpenCVLoader.OPENCV_VERSION_2_4_2, this, _openCVCallBack)) {
 err("Cannot connect to OpenCV Manager", null);
 }
 }

@Override
 public boolean onCreateOptionsMenu(Menu menu) {
 _itemFace50 = menu.add("Face size 50%");
 _itemFace20 = menu.add("Face size 20%");
 return true;
 }

@Override
 public boolean onOptionsItemSelected(MenuItem item) {
 if (item == _itemFace50)
 _minFaceSize = 0.5f;
 else if (item == _itemFace20)
 _minFaceSize = 0.2f;
 return true;
 }


 @Override
 protected void onPause() {
 info("onPause", true);
 super.onPause();
 if (_faceDetectionView != null)
 _faceDetectionView.releaseCamera();
 }

@Override
 protected void onResume() {
 info("onResume", true);
 super.onResume();
 if(_faceDetectionView != null && !_faceDetectionView.openCamera() ) {
 AlertDialog ad = new AlertDialog.Builder(this).create();
 ad.setCancelable(false); // This blocks the 'BACK' button
 ad.setMessage("Fatal error: can't open camera!");
 ad.setButton("OK", new DialogInterface.OnClickListener() {
 public void onClick(DialogInterface dialog, int which) {
 dialog.dismiss();
 finish();
 }
 });
 ad.show();
 }
 }

 public float getMinFaceSize(){
 return _minFaceSize;
 }


 /******** IOIO Stuff**********/

 private static final int SERVO_HORIZ_PIN = 6;
 private static final int SERVO_VERT_PIN = 5;
 private static final float STANDARD_IMG_SIZE = 1000f;


 /**
 * This is the thread on which all the IOIO activity happens. It will be run every time the application is resumed and aborted when it is paused.
 * The method setup() will be called right after a connection with the IOIO has been established (which might happen several times!).
 * Then, loop() will be called repetitively until the IOIO gets disconnected.
 */
 class IOIOThread extends AbstractIOIOActivity.IOIOThread {
 private final NumberFormat FORMAT = new DecimalFormat("0.00");

 private PwmOutput _onboardLED; // The on-board LED
 private boolean _ledOn = false;

 private IOIOServo _servoHoriz;
 private IOIOServo _servoVert;
 private PID _pidHoriz;
 private PID _pidVert;


/**
 * Called every time a connection with IOIO has been established.
 * Typically used to open pins.
 */
 @Override
 protected void setup() throws ConnectionLostException {
 try {
 _onboardLED = ioio_.openPwmOutput(0, 300);
 _onboardLED.setDutyCycle(0);

 _servoHoriz = new IOIOServo(ioio_, SERVO_HORIZ_PIN);
 // the vertical servo can't physically go below 60 degrees
 _servoVert = new IOIOServo(ioio_, SERVO_VERT_PIN, 60, IOIOServo.MAX_DEG);

 //empirically found PID constants, trying to get the smoothest possible movement
 _pidHoriz = new PID(0.01f, 0.001f, 0.003f, 0.05f);
 _pidVert = new PID(0.01f, 0.001f, 0.003f, 0.05f);

 // consider a standard 1000 x 1000 pixels image (just so that the proportions and speed of reaction are the same)
 _pidHoriz.setGoal(STANDARD_IMG_SIZE/2);
 _pidVert.setGoal(STANDARD_IMG_SIZE/2);
 } catch (Exception e) {
 err("", e);
 }
 }

/**
 * Called repetitively while the IOIO is connected.
 */
 @Override
 protected void loop() throws ConnectionLostException {
 // sync with face detection : only run this after it has been initialised AND a new face detection has run
 if(_faceDetectionView != null && _faceDetectionView.getFrameWidth() > 0 && _faceDetectionView._newCaptureAvailable.get()){
 _faceDetectionView._newCaptureAvailable.set(false); //we have consumed that notification, now we'll wait for a new one
 try {
 final Point faceCentre = _faceDetectionView.getFaceCentre();
 if(faceCentre != null){
 // scale x and y to STANDARD_IMG_SIZE (this was it doesn't matter what size the actual image is, we work with an input from 0 to STANDARD_IMG_SIZE)
 final float deltaX = -_pidHoriz.update((float)faceCentre.x / _faceDetectionView.getFrameWidth() * STANDARD_IMG_SIZE);
 final float deltaY = _pidVert.update((float)faceCentre.y / _faceDetectionView.getFrameHeight() * STANDARD_IMG_SIZE);

 if(Math.abs(deltaX) > 1){
 _servoHoriz.setPosition(_servoHoriz.getCurrPosition() + deltaX);
 }
 if(Math.abs(deltaY) > 1){
 _servoVert.setPosition(_servoVert.getCurrPosition() + deltaY);
 }

 info("{" + FORMAT.format(_servoHoriz.getCurrPosition()) + ", " + FORMAT.format(_servoVert.getCurrPosition()) + "}"
 + " / {" + FORMAT.format(faceCentre.x) + ", " + FORMAT.format(faceCentre.y) + "}"
 + " / {" + FORMAT.format(deltaX) + ", " + FORMAT.format(deltaY) + "}", true);
 }

 _onboardLED.setDutyCycle(_ledOn ? 1 : 0);
 _ledOn = !_ledOn;
 Thread.yield();
 } catch (Exception e) {
 err("", e);
 }
 }else{
 Thread.yield();
 }
 }
 }


 private void info(final String msg, boolean log){
 //Log.i(TAG, msg);
 runOnUiThread(new Runnable() {
 @Override
 public void run() {
 if(_msg != null) _msg.setText(msg);
 }
 });
 }

 private void err(final String msg, final Throwable e){
 Log.e(TAG, msg, e);
 info(msg, false);
 }


 @Override
 protected IOIOThread createIOIOThread() {
 IOIOThread result = new IOIOThread(){};
 return result;
 }
}

OpenCvViewBase.java
-------------------------------------------------------
package trandi.facefollowing;

import java.util.List;
import java.util.concurrent.atomic.AtomicBoolean;

import org.opencv.core.Size;
import org.opencv.highgui.Highgui;
import org.opencv.highgui.VideoCapture;

import android.content.Context;
import android.content.res.Configuration;
import android.graphics.Bitmap;
import android.graphics.Canvas;
import android.graphics.Matrix;
import android.util.Log;
import android.view.SurfaceHolder;
import android.view.SurfaceView;

public abstract class OpenCvViewBase extends SurfaceView implements SurfaceHolder.Callback, Runnable {
 private static final String TAG = OpenCvViewBase.class.getSimpleName();

private SurfaceHolder _holder;
 private VideoCapture _camera;
 final private FpsMeter _fpsMeter = new FpsMeter();
 private int _frameWidth = -1;
 private int _frameHeight = -1;

 public final AtomicBoolean _newCaptureAvailable = new AtomicBoolean(false);
 /**
 * Implement this in the subclass and play with the capture.
 */
 protected abstract Bitmap processFrame(VideoCapture capture);


 public OpenCvViewBase(Context context) {
 super(context);
 _holder = getHolder();
 _holder.addCallback(this);
 Log.i(TAG, "Instantiated new " + this.getClass());
 }

boolean openCamera(){
 Log.i(TAG, "openCamera");
 synchronized (this){
 releaseCamera();
 _camera = new VideoCapture(Highgui.CV_CAP_ANDROID);
 if(!_camera.isOpened()){
 releaseCamera();
 Log.e(TAG, "Failed to open native camera");
 return false;
 }
 }
 return true;
 }

 void releaseCamera(){
 Log.i(TAG, "releaseCamera");
 synchronized (this){
 if(_camera != null){
 _camera.release();
 _camera = null;
 }
 }
 }

 void setupCamera(int width, int height){
 Log.i(TAG, "setupCamera("+width+", "+height+")");
 synchronized (this){
 if(_camera != null && _camera.isOpened()){
 // hope for the best
 _frameWidth = width;
 _frameHeight = height;

 // get all supported preview sizes
 final List<Size> possiblePreviewSizes = _camera.getSupportedPreviewSizes();


 // select OPTIMAL preview size
 double minDiff = Double.MAX_VALUE;
 for(Size size : possiblePreviewSizes){
 if(height >= size.height && width > size.width){
 final double currentDiff = Math.max(height - size.height, width - size.width);
 if(currentDiff < minDiff){
 _frameWidth = (int)size.width;
 _frameHeight = (int)size.height;
 minDiff = currentDiff;
 }
 }
 }

 _camera.set(Highgui.CV_CAP_PROP_FRAME_WIDTH, _frameWidth);
 _camera.set(Highgui.CV_CAP_PROP_FRAME_HEIGHT, _frameHeight);
 }
 }
 }

 public void surfaceChanged(SurfaceHolder _holder, int format, int width, int height) {
 Log.i(TAG, "surfaceChanged");
 setupCamera(width, height);
 }

public void surfaceCreated(SurfaceHolder holder) {
 Log.i(TAG, "surfaceCreated");

 // start the processing thread !
 (new Thread(this)).start();
 }

public void surfaceDestroyed(SurfaceHolder holder) {
 Log.i(TAG, "surfaceDestroyed");
 releaseCamera();
 }
 public void run() {
 Log.i(TAG, "Starting processing thread");
 _fpsMeter.init();

while (true) {
 try{
 Bitmap bmp = null;

 synchronized (this) {
 if (_camera == null || !_camera.grab()){
 Log.e(TAG, _camera == null ? "Camera is null " : "Can't grab the camera" + ", probably app has been paused.");

 // do not break, for when we come back from sleep !
 Thread.yield();
 try {
 Thread.sleep(100);
 } catch (InterruptedException e) {
 Log.e(TAG, "", e);
 }
 }else{
 // to be implemented by the subclass
 bmp = processFrame(_camera);

 _fpsMeter.measure();
 }
 }

 if (bmp != null) {
 final Canvas canvas = _holder.lockCanvas();
 if (canvas != null) {
 //Change to support portrait view
 Matrix matrix = new Matrix();
 matrix.preTranslate((canvas.getWidth() - bmp.getWidth()) / 2, (canvas.getHeight() - bmp.getHeight()) / 2);

 if (getResources().getConfiguration().orientation == Configuration.ORIENTATION_PORTRAIT) {
 matrix.postRotate(90f, (canvas.getWidth()) / 2, (canvas.getHeight()) / 2);
 }

 canvas.drawBitmap(bmp, matrix, null);


 _fpsMeter.draw(canvas, (canvas.getWidth() - bmp.getWidth()) / 2, (canvas.getHeight() - bmp.getHeight()) / 2);
 _holder.unlockCanvasAndPost(canvas);
 }
 bmp.recycle();
 }
 }finally{
 _newCaptureAvailable.set(true); // signal that we have new image captured
 Thread.yield();
 }
 }
 }


 public int getFrameWidth(){
 return _frameWidth;
 }
 public int getFrameHeight(){
 return _frameHeight;
 }
}

PID.java
-------------------------------------------------------
package trandi.facefollowing;

import android.os.SystemClock;
import android.util.Log;

public class PID {
 private static final String TAG = "trandiTAG";

 private final float _kp;
 private final float _ki;
 private final float _kd;
 private final float _maxIntegralErr;

 private float _setPoint;
 private float _integralErr = 0;
 private float _previousErr = 0;
 private float _previousTime = SystemClock.elapsedRealtime() / 1000f; // in seconds

 public PID(float kp, float ki, float kd, float maxIntegralErr){
 _kp = kp;
 _ki = ki;
 _kd = kd;
 _maxIntegralErr = Math.abs(maxIntegralErr);
 Log.i(TAG, "PID set up: " + _kp + " / " + _ki + " / " + _kd + " / " + _maxIntegralErr);
 }

 public void setGoal(float setPoint){
 _setPoint = setPoint;
 Log.i(TAG, "Set point to: " + _setPoint);
 }

 public float update(float currentValue){
 final float currentErr = _setPoint - currentValue;
 final float currentTime = SystemClock.elapsedRealtime() / 1000f;
 final float dt = currentTime - _previousTime;
 if(dt == 0){
 Log.e(TAG, "Called too quickly, you need to leave some time between successive calls");
 return 0f;
 }

// 1. add the Proportional term
 float result = _kp * currentErr;

 // 2. add the Integral term
 _integralErr += currentErr * dt;
 if(_integralErr < -_maxIntegralErr) _integralErr = -_maxIntegralErr;
 else if(_integralErr > _maxIntegralErr) _integralErr = _maxIntegralErr;
 result += _ki * _integralErr;

 // 3. add the Derivative error
 result += _kd * (currentErr - _previousErr) / dt;

 // 4. update state
 _previousErr = currentErr;
 _previousTime = currentTime;

 return result;
 }
}






By hearing the servos and looking at their movement, it seems that you are refreshing the position a bit too slow. Are you updating the servos position every new frame?
I had a similar problem and resolved it by calling the PD controller code in a separate thread every 10ms. As a result, I have 3 PID cycles to get the servos in the position and get them moving smooth, as shown here:
Yep, you’re TOTALLY RIGHT, that’s exactly what I’m doing.
I thought what’s the point in updating anything more often than the frequency of new information.
BUT you’re right the PID lags behind and can take a while to settle, so having several cycles between each new frame can be useful (proved by your video…:) ).
Now I’m still uncomfortable from a theoretical point of view with having 3 cycles of something that run basically on the same constant and stale information… wouldn’t the “clean” solution to tweak the PID algorithm to be faster to respond !?
Dan
Hi, Trandi. I am an amateur in this field, but your articles and projects really have excited me! Earlier I used to try my hand in little bit of robotics, so I was able to understand some of your projects on Robots. I am going to try them myself, especially the tank :P. If it works out, I will post the video! Thanks for your guidance!
Did you use viola-jones algorithm to tracking the face ?
Yes, if you look at the code in my post I use a CascadeClassifier, which (I’ve just discovered this wondering what to answer you 🙂 ) indeed is based on viola-jones :
http://docs.opencv.org/modules/objdetect/doc/cascade_classification.html
Dan
Have you try to tracking your own or your friends face ? I mean not use a photo to tracking the face. Because I read from the website said the performance using Haar Cascades was worse. What do you think ?
Yes. I haven’t done any serious comparison, but from the little I saw there was no difference.
dan
Hi Dan.
Really cool project!
I am working on a project that uses OpenCV on android and since you’ve done something quite similar, I would appreciate some help on the same.
I am working on the HTC Evo V4G, which has 2 back cameras to enable 3D vision. I cannot use OpenCV’s Android functionalities to access the camera on this phone. Hence, we need to use the Android SDK to obtain images through the camera. However, being newbies at this stuff, we have absolutely no clue how to obtain an image (in Bitmap form) through the SDK and convert it to OpenCV format of Mat for further processing.
Please let me know if you can provide any help.
Thanks,
Jay
Hi Jay,
Thank you for your comment…
I actually now remember having read one of your posts (http://jayrambhia.wordpress.com/2012/06/20/install-opencv-2-4-in-ubuntu-12-04-precise-pangolin/ I think) when I was setting up my OpenCV on Android…:)
I’m glad you found my post useful too !
Regarding your question, you should do something like this to get an image from the camera (update this to benerate a bitmap eventually):
Intent cameraIntent = new Intent(android.provider.MediaStore.ACTION_IMAGE_CAPTURE);                 mImageCaptureUri1 = Uri.fromFile(new File(Environment.getExternalStorageDirectory(), "your_name.jpg"));

cameraIntent.putExtra(android.provider.MediaStore.EXTRA_OUTPUT, mImageCaptureUri1);

cameraIntent.putExtra("return-data", true);

startActivityForResult(cameraIntent, CAMERA_REQUEST);
For the conversion part, it should be really straight forward: if you look at my code you see
org.opencv.android.Utils.matToBitmap(_rgbaMat, bmp);so I’m pretty sure there’s a method that does the opposite.Hope this helps, I’m really curious to see the end result of your project !
Dan
P.S. I’m currently working on porting OpenTLD on Android (using OpenCV) but I struggle with both the performance and the detect/learning parts…
Hi Dan,
Thanks for the quick reply. I am glad that my blog post was helpful. So I tried what you have suggested. I’m using Evo V 4G with Dual (Stereoscopic) Camera and when I used intent, it always started the camera in 2D mode (i.e. only one camera was initialized). But since I want to get images from both cameras, this can not be used.
I found another way. So I directly convert bytes data of image to OpenCV Mat using Mat.put() and convert to RGBA/Gray. I have posted the solution here. http://stackoverflow.com/questions/15959552/unable-to-use-both-cameras-of-evo-4g-using-opencv4android/
P.S. I have also worked with OpenTLD. I have made a Python port but it lacks learning and performance is very poor. I hope to work on it this summer.
Good to hear you found a solution, though I’m not sure I understand your post… You still seem to get only one image, but are you saying it actually contains the 2 images from the 2 cameras, one next to the other ? hence your “400+width/2” trick ?
Dan
hey, man, I am wandering if u would make “simpler version” of ur robot using facedetector.face importation then make it move forward chasing without PID algo. I am sure ur robot will be learning hit for beginers including me, man. and if u r willing to make it “arduino version”, I will send u a uno or even mega, bro (it only takes usb connection in later android version and uno up for android-arduino connectivity)
Thanks, it’s kind of you to even offer to send an Arduino, but I can’t really help… My biggest issue right now is TIME, as I don’t have much left between my job and the baby, so I’m trying to spend the little I have, on what really interests me most…
Dan
cool, bro! u should take some look at a youtube channel named sentrygun53. he used to make sentry gun using pc and arduino, using processing program and a webcam. now we have to buy his shield, which is cheap too.
TDL on android is like prototype of TERMINATOR real version, bro, damn cool and very intimidating. I have just take a look and it is super cool, intimidating from the view of its posibility of development. too advanced for newbs but super cool, man
sounds verry advancing, super cool, man. though im afraid newbs like me cant put our hands on that. but I will put my eyes on that, it is still too interesting, heheh. the site I gave u, I cant put it here, it is a google code site, named “android-object-tracking”. it is an android robot using arduino uno that simply tracks an orange ball then move towards it. they have a video in youtube too, named “android object tracking robot”.
the thing about this robot is that it is “the simplest working android robot that has reached level of intimidating”. whoever owns the robot, be it even a newbie like me, will have enough guts and enthusiasm to lay their hands on, man, if someone replace the opencv object track with facedetector.face (since we newbs dont need to understand the algorythm at first). I think opencv is still too much for newbs, man, and facedetector.face will help us out a lot
Nice… though to be honest he could do with some PID controlling of the motors to have some more “fluent” movements… If you want to see my take on target following, and shooting !, then have a look here: https://trandi.wordpress.com/2011/05/14/tiger-1-bb-airsoft-rc-tank-%E2%80%93-v3/
It actually uses an NXT controller and a Wiimote infra red camera, rather than visible light…
Dan
sounds verry advancing, super cool, man. though im afraid newbs like me cant put our hands on that. but I will put my eyes on that still, it is too interesting, heheh. the site I gave u, I cant put it here, it is ib google code, named “android-object-tracking”. it is an android robot using arduino uno that simply tracks an orange ball then move towards it. they have a video in youtube too, named “android object tracking robot”.
the thing about this robot is that it is “the simplest working android robot that has reached level of intimidating”. whoever the owner of the robot, be it even a newbie like me, will have guts and enthusiasm to lay their hands on, man, if someone replace the opencv object track with facedetector.face (since we newbs dont need to understand the algorythm at first). I think opencv is still too mucg for newbs, man, facedetector.face will help us out a lot
sounds cool! btw about ioio vs arduino, u can take a glimpse on ADK( android development kit, android made it official itself) in this site of google code. he uses arduino uno (without bluetooth module) and his object following robot even does the chase after an object it tracks (I surely think u want to develop ur robot in that direction too). please google “android object tracking robot” and it shall shows up 1st on the list, bro. (but he doesnt give full source, I have been wanting this robot but could do nothing).
I’m not sure I see which site / page you are referring to… However right now I’m working on something far more interesting : porting TLD to Android. I don’t know if you’ve read about this algorithm ( http://info.ee.surrey.ac.uk/Personal/Z.Kalal/tld.html) but where all this OpenCV face tracking and/or the Android face recognition class only detect something, this algorithm combines this with 2 other stages: tracking and learning !
If you watch the videos you’ll see hoe much more powerful this is than simple detection…
Dan
this is cool since it shows the capability of opencv implementing, but android already has facedetector.face importation for this purpose. I think it serves the newbies well in their learning of “autonomouzing android” (android moves by its own from video input, and I want to learn like hell too, actually). there is an android app named monkeycam, u could google for the programs explanations using faeetector.face importation. and why dont u use arduino, since it suits the need of the motors ( u could use huge dc motors, hbridges are available for that), it is older, and android has stated arduino is the official android devkit, plus it is cheap amd available for anyone. please make arduino version, man, so many people including me would be able to reach this project if so. 🙂
Wow, I had no idea that the Facedetector class existed in Android. This sounds like a much easier approach, and probably much more reliable as I’m not at all impressed with the OpenCV face detection… I’ll definitely give it a try !
As for the Arduino VS IOIO, I simply took the quickest option. For the Arduino, you need a way to connect it to your Android phone, be it bluetooh or an USB shield, etc. … and I didn’t want to be bothered with it.
Also I wanted to focus on the Android code rather than have to write stuff for a micro-controller…
Dan
As usual – super cool! Definitely one of the examples I’m going to use for how the built-in awesomeness of Android can upgrade and simplify your physical computing projects.
Want to collaborate on making your UltiMaker run by Android? I’ve wanted to do that for a while…
Thank you, you are obviously being too nice…:)
But indeed the “problem” with Android is that so many things become almost frustratingly easy..:) You have a webcam, an awesome screen, lots of CPU and plenty of connectivity, all available through a really nice and easy high level programming model !
For this project, I spent more time mending the Ultimaker than programming the Android phone.
And IOIO continues in this direction. I was tempted to use one of those small bluetooth to serial devices, but the IOIO saves so much time and makes everything so much easier…
Dan
P.S. for the Ultimaker / Android stuff, YES of course… ! Don’t really know how much spare time I have, but do send me an e-mail with the plan you have…